# Contributing
Please read and understand the contribution guide before creating an issue or pull request.
# Important Links
# Etiquette
This project is an open source project, and as such, the maintainers use their free time to build and maintain it. The code is freely available and can be used, forked and modified.
Please be considerate towards maintainers when raising issues or presenting pull requests.
It's the duty of the maintainer to ensure that all submissions to the project are of sufficient quality to benefit the project. Many developers have different skill sets, strengths, and weaknesses. Respect the maintainer's decision, and do not be upset or abusive if your submission is not used.
# Viability
When requesting or submitting new features, first consider whether it might be useful to others. Open source projects are used by many developers, who may have entirely different needs to your own. Think about whether or not your feature is likely to be used by other users of the project.
# How to submit changes?
- Check the codebase to ensure that your feature doesn't already exist.
- Check the pull requests to ensure that another person hasn't already submitted the feature or fix.
- Use the pull request template (opens new window).
# How to report a bug?
- Attempt to replicate the problem, to ensure that it wasn't a coincidental incident.
- Check to make sure your bug report isn't already present within the project.
- Check the pull requests tab to ensure that the bug doesn't have a fix in progress.
- Check the pull requests tab to ensure that the feature isn't already in progress.
- Use the issue template (opens new window).
# PR Requirements
The PR must apply to PSR-2 Coding Standard (opens new window). StyleCI help you detect code style issues.
The PR must be as clean as possible. Try to remove all inline TODOs and unneeded comments. They are noise and distraction for the reviewer. Use Github's (inline) comment system to start a discussion about a change.
The existing tests must not fail after your changes. This would indicate that existing functionality is broken and should be addressed before a review is started. You can run the test by running
vendor/bin/phpunitThe changes must be backed-up with tests.
The PR must only have one feature. Split up multiple features in multiple PRs, so they can be individually reviewed and merged.
The PR must be accompanied by a PR to the docs in case of new features. Documentation is located in the https://github.com/larammerce/docs (opens new window) repository.
The PR should contain meaningful commit messages.
The PR must be accompanied by a PR to the docs in case of new features. Documentation is located in the https://github.com/Larammerce/docs (opens new window) repository.
The PR should contain meaningful commit messages.
TIP: Public Relations is one of the most effective ways to build on marketing strategies and create a solid online reputation. 1
# Project management
Here you can learn about how Larammerce manages user stories and features to be developed and released.
Taiga is the tool that is used as the project management system, and also Larammerce backlog board (opens new window) is publicly visible for people to check. also, it should be mentioned that Scrum is chosen as the management methodology for this project.
# A brief about scrum
As mentioned before, scrum is used as the main methodology, so let's describe it briefly:
# What is user story?
User Story is usually a term in software development and management in various fields that will be collected to describe customer needs. In software development and product management, the user story is an informal, natural language description that describes one or more features of the software system. a user story is a tool used in Agile software development to describe a software feature from an end-user perspective. User story users describe what they want and why. a user story helps to create a simple description of a need.
It is interesting to know that Mike Cohn, who is one of the main inventors of the Scrum development method, quotes as follows:
Every user story consists of one or two sentences written and, more importantly, a series of conversations about optimal performance.
# Why user story?
With the user story approach, you are content with just enough design instead of a large and comprehensive design. user story reduces the time required to write comprehensive documentation by emphasizing customer-centric conversations. As a result, user story enables teams to deliver quality software faster.
The user story method will save time because it is modified and improved according to the users. As a result, the quality in the process of software development or other products has increased and the upcoming project will be liked by the customer.
# Working with user story
The user's story is written in simple language that must pursue a specific purpose and have a specific reason. The user in the story must be real and not a member of the development team. There may be multiple user stories in the system that have the same benefits. This is normal. It's a good idea to start drafting a user story. The draft must first meet your essential needs. That:
1. Who is it designed for?
2. What are the expectations from the system?
3. Why is it important?
However, the user's story is a process during which needs are discovered and should not be used as a document to analyze needs. In traditional methods, the system analyst usually tried to understand the customer's needs, but in modern methods, the following steps must be followed to identify the user story:
1. You need to talk to users.
2. User needs are written as a user story. This post should specify what the user needs and what the goal is.
3. After writing the needs, you will be faced with a source of user needs that must be fully understood and reviewed by the team.
# Team procedures to manage
Meetings are held according to the scrum structure in the Larammerce team, which includes grooming and sprint sessions:
| Grooming sessions | Sprint sessions |
|---|---|
| 1. In this type of meeting, which is held on Saturdays, team Larammerce discusses technical issues. | 1. These meetings are held periodically on Sunday . |
| 2. In these sessions, user stories are created and divided into smaller sections. | 2. In these meetings, teammates make a decision about user stories, make them viable, and then it's time to assign the user stories to specific team members. so every team member is responsible for their own user stories. |
| 3. There are discussions among Larammerce team members about how to better do the user story. | 3. Every user story is discussed one by one and the estimation process begins, so every teammate announces the point of view and finally, a point for the weight of each user story is assigned. |
| 4. And finally, the user story is ready for being estimated in sprint upcoming sessions. | 4. And finally enters the execution cycle. |
NOTE: The first thing after every sprint session is that every team member is responsible for writing notes in their own user stories according to what is mentioned in the sessions, and after that, the most necessary thing is that they must create the tasks of each owned user story right after sprint sessions.
NOTE: The user story can be created by anyone and also the person who creates the user story is required to add a brief description.
NOTE: The interesting thing here is that there is a difference between a user story and a task, to understand this difference we focus on a quote from Mike Cohn.
User stories are in the product backlog, and tasks are identified during sprint scheduling and become part of the sprint backlog.
the better distinction is that stories contain multiple types of work (e.g., programming, testing, database design, user interface design, analysis, etc.) while tasks are restricted to a single type of work. 2
# How to create a new task?
As you know the smallest doable part of a user story is the task, so to create a task you have to enter the current sprint, then click on the specific user story which belongs to you, and after all click on the create task button. so there are new tasks created under the user story section. Please note that user stories must have at least one task underneath.
Once the project is cloned (or you cloned and worked on it before), to begin the process of development or writing code to do the assigned user story, you have to update the project. So after updating your project to the upstream, you can make a new branch from the main brach (named master or main) by the commend below:
# PATTERN
git checkout -b feature/the-title-of-the-feature
NOTE: note that naming the new branch follows the hierarchical naming rules. A user story is about one of the following:
1. Feature
2. Issue
3. Enhance
4. Fix
5. Hotfix
So if you want to name the working branch follow the naming rules.
# PATTERN
prefix/name-of-the-user-story-title
# EXAMPLE
git chekout -b feature/docs-boilerplate
# Start to code
For this purpose, in this section, to better understand you, The Larammerce team will go through the steps of creating a task with you in this section.
1. In this step, you create a sub-branch on the main project:
NOTE: Here the stable branch is the name of the main branch of the project that you can not modify.
# SOURCE
git chekout stable #you get out of the stable brunch.
git chekout -b feature/docs-boilerplate #you create a sub-branch.
#Switched to a new branch 'feature/docs-boilerplate'
2
3
2. In this step, you can start to code, create/modify/update/delete specific files to achieve the desired goals of the user story:
For example you can make some modifications on the file test.php.
# EXAMPLE
#this is a test line to create a test commit.
3. Each time you complete a piece of work, you must add the files to a staging environment:
# SOURCE
git add TEST.php
4. After all, you can save your changes to the git tree by committing them:
# SOURCE
git commit -a #Execute the commit step with the help of this command.
NOTE: Make sure that the first line of your commit message is concise and also imperative.
NOTE: After a brief description, you can pass the notes that are necessary for the taiga platform to detect that you've done the specific task. So please note how it is done:
Also, you can read the docs provided by the taiga team (opens new window) to know more about this integration feature.
NOTE: You can have a brief description of the work done.
There is a requirement here that you can fulfill. If in the third line you write and save the command TG-449 #in-progress or TG-449 #ready-for-testwhen you enter the taiga site in the taskbar in the browser, you will see that task number "449" has been entered from the new section in progress or ready for testing.
NOTE: A very important point in handling tasks that should be mentioned here is that only one person named the tester can put the task in close or need info mode.
# EXAMPLE
Design the pages.

TG-449 #in-progress
2
3
# EXAMPLE
Design the pages.

TG-449 #ready-for-test
2
3
And then we use the git status command to see the changes:
# SOURCE
git status
#And below you see the output of the above command.
#[feature/docs-boilerplate (root-commit) cc04ebe] Design the pages
#1 file changed, 3 insertions(+)
#create mode 100644 TEST.php
2
3
4
5
5. you put the desired file in GitHub using the following command:
# SOURCE
git push --set-upstream origin feature/docs-boilerplate
6. Here you have to mention that there are differences between GitHub and GitLab projects in this stage:
in GitHub, you create pull requests and in GitLab create merge requests. so let's describe them one by one.
# Creating the merge request
There are several ways to create a merge request in GitLab.
- From the merge request list (opens new window)
- When you add, edit, or upload a file (opens new window)
- When you create a branch (opens new window)
- When you use Git commands locally (opens new window)
- When you work in a fork (opens new window)
- By sending an email (opens new window)
But the way the Larammerce team submits the merge request is when when you use Git commands locally.
Well let's see the steps:
1. Create a branch:
# EXAMPLE
git checkout -b my-new-branch
2. Create, edit, or delete files. The stage and commit them:
# EXAMPLE
git add .
git commit -m "My commit message"
2
3. Push your branch to GitLab:
# EXAMPLE
git push origin my-new-branch
GitLab prompts you with a direct link for creating a merge request:
...
remote: To create a merge request for my-new-branch, visit:
remote:   https://gitlab.example.com/my-group/my-project/merge_requests/new?merge_request%5Bsource_branch%5D=my-new-branch
2
3
4. Copy the link and paste it in your browser.
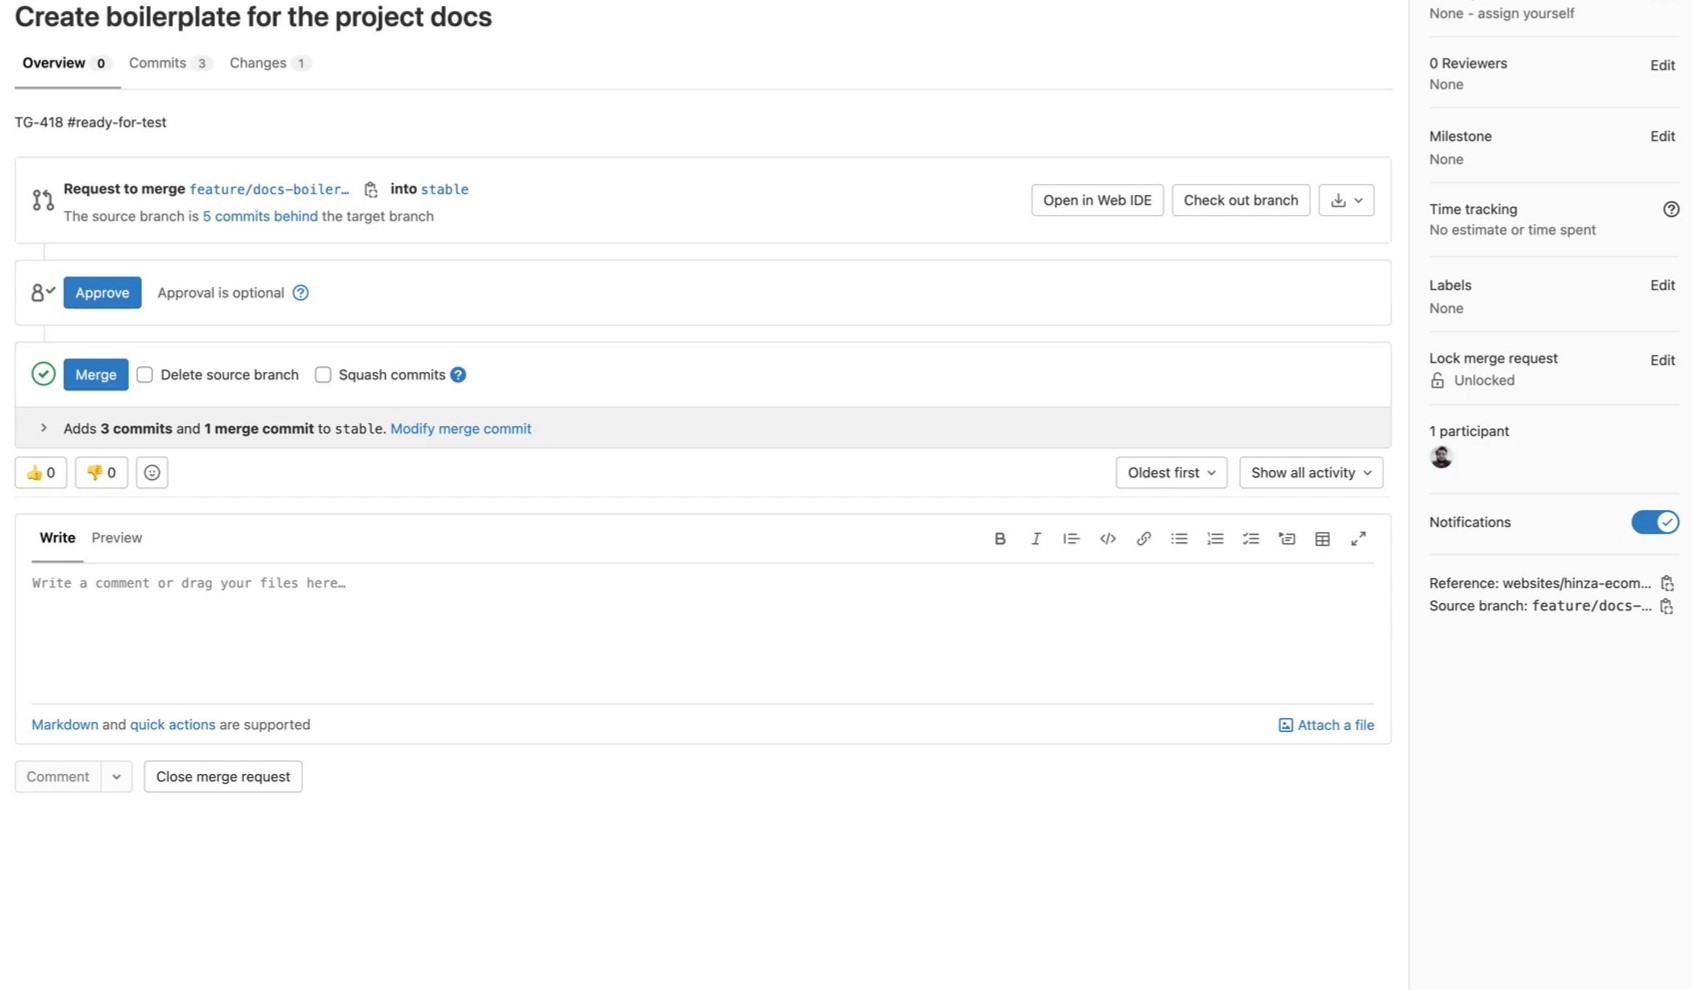
As you can see, creating a merge request is just a very simple task, just after each commit you have done, click on the link that GitLab creates for you to enter the GitLab site and create a merge request for the user story. After clicking on the link provided by GitLab, you will enter the following page on the GitLab site:
5. Type a title and description for your merge request, and finally, click on the create merge request button:

After clicking the create merge request button, you must check to see if there is a conflict. If there is no conflict, you are done and you will have to wait for the team experimenter to review the user story done by you.
For more information, see "How to create merge requests (opens new window)".
# Creating the pull request
You can create a traction request to suggest and collaborate on changes to a repository on GitHub. If you want to create a new branch to request your traction and you do not have permission to write to the repository, you must first fork the repository.
TIP: A fork is a copy of a repository that you manage. Forks let you make changes to a project without affecting the original repository. You can fetch updates from or submit changes to the original repository with pull requests. 3
NOTE: To open a pull request in a public repository, you must have write access to the head or the source branch or, for organization-owned repositories, you must be a member of the organization that owns the repository to open a pull request.
Well let's see the steps:
1. On "GitHub.com", navigate to the main page of the repository.
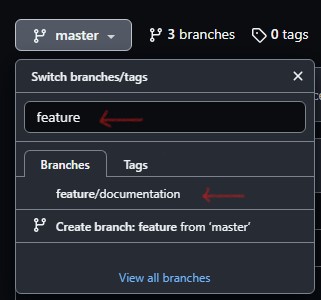
2. In the Branch menu, choose the branch that contains your commits:
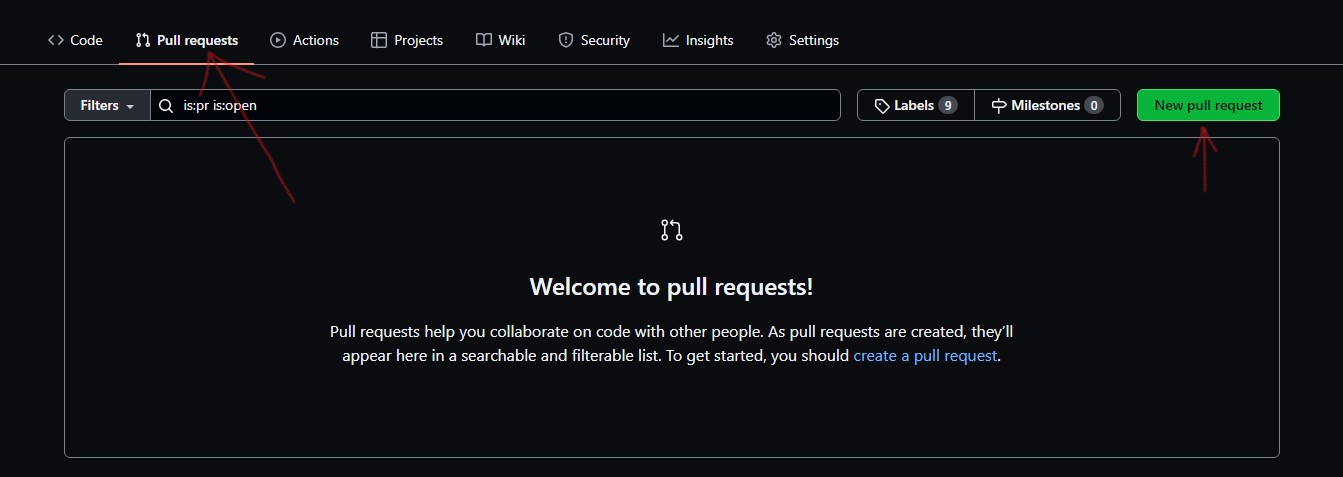
3. At the top of the file list, click Pull request and then New pull request:
4. Use the base branch dropdown menu to select the branch you'd like to merge your changes into, then use the compare branch drop-down menu to choose the topic branch you made your changes in:

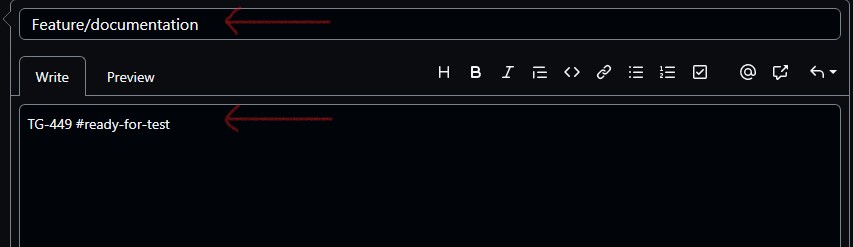
5. Type a title and description for your pull request:
6. To create a pull request that is ready for review, click Create pull request:

For more information, see "How to create pull requests (opens new window)".
After you create a pull request, you can ask a specific person to review your proposed changes. For more information, see "Requesting a pull request review (opens new window)".
# Conclusion
How to contribute to developing or maintaining Larammerce.
The following is a brief description of how to participate in Larammerce.
# Team rules
1. Team Larammerce sprints are now once every two weeks, if you are given a user story you have two weeks to execute the desired user story, but this does not mean that you end-user stories at the end to run a 30% sprint, team members have to tell a series of user stories every weekend.
2. Presently, Larammerce has an average of 8 points for the user history to do.
3. Team members must have completed (8 pts) merge requests by the end of each week, and this is an important rule in the Larammerce team.
4. At least one commit must be made for each task.
5. Team members must have at least one committed by Friday night to be tested by the team tester on Saturday morning.
6. On the Saturday morning before the meeting, team members should review 10 to 15 backlog user stories and prepare their comments and questions for the meeting.
7. After performing the user story, the person testing the user story, or the team member's code, moves the user story from the ready for test column to the closed column if there is no user story problem. This means that the user story is complete.
8. Also, after Sunday sessions, which are in scrum mode, each member of the team is required to add user story-related tasks.
9. Finally, you enter the payment cycle discussion where Larammerce pays you based on the number of points Fibonacci numbers (opens new window) done.
10. For every document that is written and placed in the documentation section of the Larammerce site, the members of the Larammerce team are obliged to read it.
# PR review
This section describes how to run, test, and review your teammate's pull request using an editor on your local system.
Git provides the capability to replicate your local repository, including the main and side branches, onto another computer accessible via the internet. This enables others to access and apply your code to their own systems. Remote servers such as GitHub or GitLab, among other Git-based platforms, may be utilized for this purpose. Typically, two remote repositories are employed: REMOTE(Origin) and REMOTE(Backup). Therefore, it is essential to select the intended remote repository to retrieve the most recent modifications in your local system.
If you are contributing to the Larammerce-docs project, you have already forked and cloned the REMOTE(Origin) repository from https://github.com/larammerce/larammerce-docs. So the larammerce-docs project on your local system pulls the data from https://github.com/[your-account-name]/larammerce-docs as REMOTE(Origin), while on the teammate's local system pulls from https://github.com/[teammate-account-name]/larammerce-docs as REMOTE(Origin).
For example when you are on branch_1 in your local system and run git push --set-upstream origin branch_1, the branch_1 is pushed from your local system to your REMOTE(Origin) repository, i.e. https://github.com/[your-account-name]/larammerce-docs.
Suppose your teammate creates a new branch, named sample-branch, in his local system and pushes it to his REMOTE(Origin) repository and requests to merge it into the master branch of the Larammerce-docs project. In order to have your teammate's sample-branch on your local system, create a new remote, for example REMOTE(Teammate-Origin), which pulls the data from https://github.com/[teammate-account-name]/larammerce-docs into your local repository. Run the following command on the master branch of your local repository:
git remote add Teammate-Origin https://github.com/[teammate-account-name]/larammerce-docs.git
Now by running git remote, you can see the list of remotes, containing the newly generated Teammate-Origin.
Create the sample-branch in your local repository:
git checkout -b sample-branch
Run the command below on the sample-branch:
git pull -f Teammate-Origin sample-branch
Note: Replace the command below if you run into an issue with pulling the new data:
git merge Teammate-Origin/sample-branch
Now you can run npm run docs:dev to see the result in the browser.
# Video source
# Reference
1. What is PR? (opens new window)
2. What is difference between a user story and a task? (opens new window)