# Installation
Larammerce is an open-source ecommerce platform that helps business owners to focus on their concerns and just have the whole complete solution for their online market.
It's been built based on the Laravel framework (opens new window) which is open source and free to use.
This guide is a comprehensive resource for both development and production environment setup. We welcome your contributions to Larammerce!
Note: The instruction for development is based on Ubuntu 22.04, and the instruction for production is based on CentOS 7.
# Development installation guide
To develop the Larammerce project, sufficient knowledge of PHP and Laravel framework is vital. Follow the requirements and setup instructions demonstrated in this article.
# Requirements
| Requirement | Details |
|---|---|
| Operating system | GNU/Linux (Ubuntu 22.04 Recomended) |
| Relational database | MySQL 5.7 or higher |
| Interpreter | PHP version 8.0 |
| Node.js | Version 16 (Recomended) |
| Package manager | Composer |
| Cache DB | Redis |
# Environment setup
This tutorial assumes you have a raw Ubuntu distro on your Linux kernel. You are free to use your preferred distribution, but consider changing the commands based on your distro structure.
# OS requirements
However PHP is already a cross-platform language and doesn't need a specific platform; Still, to extend Larammerce project scripts and develop the project, you must install the Linux 1 kernel or the WSL 2 (Windows Subsystem for Linux) on your system due to the lateral scripts involved with this project.
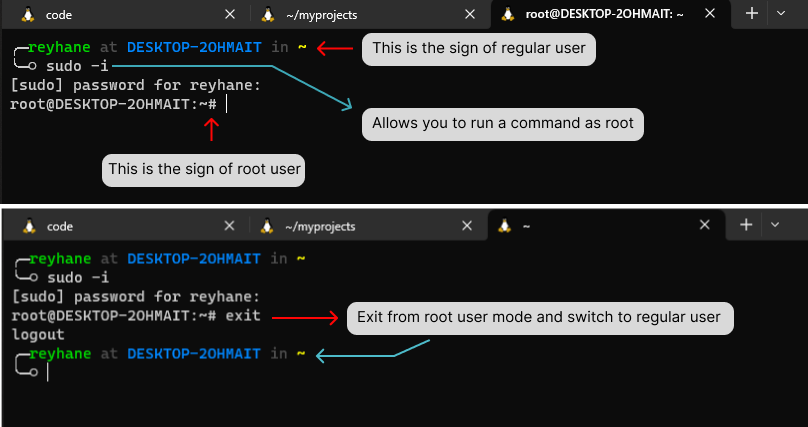
Potential Risk of Root User Mode in Linux
There are two different user modes in Linux: the root user and the regular user. If you are in root mode, you must be careful because you have superuser privileges, which can lead to accidentally deleting critical files or causing other problems. For safety, it's better to remain in regular mode whenever possible.
# Install MySQL 5.7 (oracle)
Due to security issues, oracle released version of MySQL is recommended for businesses.
To install MySQL on Ubuntu, follow instruction demonstrated in this page (opens new window) or follow steps bellow:
Download the MySQL repository by executing the following command:
wget https://dev.mysql.com/get/mysql-apt-config_0.8.12-1_all.deb
Now install MySQL package:
sudo dpkg -i mysql-apt-config_0.8.12-1_all.deb
Now update the apt repository:
sudo apt update
Facing GPG error? No worries! You have to set a public key to resolve this error. To do so run the following command:
sudo apt-key adv --keyserver keyserver.ubuntu.com --recv-keys 467B942D3A79BD29
execute the apt update again:
sudo apt update
To check whether MySQL 5.7 repository has been successfully installed, execute:
sudo apt-cache policy mysql-server
You should see MySQL 5.7 repository at the bottom of the displayed list.
Now install MySQL 5.7 :
sudo apt install -f mysql-client=5.7* mysql-community-server=5.7* mysql-server=5.7*
Before starting to use MySQL 5.7, you need to secure it first:
sudo mysql_secure_installation
Provide a password and answer the security questions.
Enable MySQL:
Run this command to enable MySQL on Linux:
sudo systemctl enable mysql
Now start MySQL :
sudo systemctl start mysql
You may need to restart MySQL in order to apply updates or make configuration modifications:
sudo systemctl restart mysql
- If you are working with WSL, it is recommended to download the windows version of MySQL from here (opens new window).
Once you installed MySQL, create a database so to connect the project to a database:
mysql -u root -p -e "create database <database name>"
# Install php 8.0
To install php 8.0 on Ubuntu follow steps below:
- First, retrieve the list of system packages and dependencies to the latest available version:
sudo apt update
- Second, optimize repositories management by running the following command:
sudo apt install software-properties-common
- Now add
PHP PPAto get access to new php packages and be able to download php 8.0:
sudo add-apt-repository ppa:ondrej/php
- And as the final step, use this command to install php 8.0:
sudo apt install php8.0 php8.0-bcmath php8.0-mysql php8.0-pdo php8.0-mbstring php8.0-curl php8.0-imagick php8.0-simplexml php8.0-soap php8.0-xml php8.0-redis php8.0-mongodb php8.0-gd php8.0-zip
We're done here !
# Install jq
To install the JSON processor run the command below:
sudo apt install jq
# Install Node.js
According to the need of the project we tend to install node.js version 16.
curl -sL https://deb.nodesource.com/setup_16.x -o nodesource_setup.sh
Run the script with sudo:
sudo bash nodesource_setup.sh
By running the above command, the PPA will be added to your configuration and your local package cache will be updated automatically.
Now execute this command to install nodejs:
sudo apt install nodejs
# Install composer
Composer is a dependency management tool. Follow download instructions step by step:
- First, download the installer to the current directory:
php -r "copy('https://getcomposer.org/installer', 'composer-setup.php');"
If you have any security concerns, verify the installer SHA-384 by following the instructions composed on getcomposer.org (opens new window).
- Second, run the installer:
php composer-setup.php
- Third, remove the installer:
php -r "unlink('composer-setup.php');"
Now put the file 'composer.phar' into a directory on your PATH, so you can simply call composer from any directory (Global installation):
sudo mv composer.phar /usr/local/bin/composer
To check the installed version run:
composer -V
# Install redis
Redis is an in-memory data structure store, used as a distributed, in-memory key–value database, cache and message broker, with optional durability.
To install redis, run:
sudo apt install redis
Enable Redis
Run this command to enable Redis on Linux:
sudo systemctl enable redis-server
now start Redis:
sudo systemctl restart redis-server
If using WSL, consider you should execute this script every time you start the windows to initialize Redis:
/etc/init.d/redis-server start
All the installations required for development have been completed. You can now setup Larammerce project.
# Production installation guide
This section provides the procedures to install the Larammerce project in the production environment.
The tutorial is based on CentOS 7. You are free to choose your preferred distro, but consider changing the commands' structures based on your distro.
# Requirements
| Requirement | Details |
|---|---|
| Operating system | gnu/Linux-based (CentOS 7 preferred) |
| Relational database | MySQL 5.7 |
| Interpreter | Php8 |
| WebServer | Apache2/Nginx |
| Cache DB | Redis |
| Logs DB | MongoDB |
| Mail Server | any SMTP server |
| Package manager | Composer |
Note: Installation of MongoDB is not required for deployment.
# Environment setup
Potential Risk of Root User Mode in Linux
There are two different user modes in Linux: the root user and the regular user. If you are in root mode, you must be careful because you have superuser privileges, which can lead to accidentally deleting critical files or causing other problems. For safety, it's better to remain in regular mode whenever possible.
# Install jq
- Install the
JSONprocessor running the command below:
sudo yum install jq
# Install HTTPD (Apache2 web server)
To install apache2 on CentOS you have to run the command below:
sudo yum install httpd
Enable and start the HTTPD service in Linux:
systemctl enable httpd
systemctl start httpd
2
As the apache user created by httpd has no access to the system shell, you have to manualy get the permission.
Open the passwd file with your editor:
vim /etc/passwd
To change the default shell and home directory for the apache user, change the /bin/nologin to /bin/bash or any other desired shell:
apache:x:48:48:Apache:/var/www:/bin/bash
Then set a password for the apache user.
passwd apache your_password
Once you set a password, login as the Apache user with the following command:
su - apache
In order to modify the current configuration for the httpd, open the httpd.conf file:
vim /etc/httpd/conf/httpd.conf
Find and replace all the /var/www/html with the /var/www/larammerce/public_html:
:%s/\/var\/www\/html/\/var\/www\/larammerce\/public_html/g
Note: The above command is for replacing the path in the search field using VIM. It may be different in your text editor.
And after all, restart the httpd daemon:
systemctl restart httpd
# Install Node.js
As Larammerce is using the Laravel framework as its core system, inherits all the Laravel features. For example, Larammerce uses nodejs to build its resource bundles and minify them.
As the root user, run the following curl command to add the NodeSource yum repository to your system:
curl -sL https://rpm.nodesource.com/setup_16.x | sudo bash -
Note: According to the need of the project we tend to install node.js version 16.
Now install Node.js:
sudo yum install nodejs
# Install MySQL 5.7
As Larammerce is used for production and stable versions of dependencies are needed to be used, the preferred version of Oracle/Mysql is 5.7 due to security issues.
First, add the MySQL Yum repository to your system's repository list.This is a one-time operation, which can be performed by installing an RPM provided by MySQL:
sudo yum localinstall https://dev.mysql.com/get/mysql57-community-release-el7-9.noarch.rpm
RPM packages have a built-in GPG signature. Import the MySQL public build key into your own GPG keyring directly from a URL by this command:
rpm --import https://repo.mysql.com/RPM-GPG-KEY-mysql-2022
Install MySQL by the following command:
sudo yum install mysql-community-server
This installs the package for MySQL server (mysql-community-server) and also packages for the components required to run the server, including packages for the client (mysql-community-client), the common error messages and character sets for client and server (mysql-community-common), and the shared client libraries (mysql-community-libs).
During the installation process of packages, a temporary password will be created and placed in MySQL log files. Follow these steps to find your temporary MySQL password:
- Enable the MySQL Service and start it:
systemctl enable mysqld
systemctl start mysqld
2
- Now run the following command to get the temporary root password:
grep 'A temporary password' /var/log/mysqld.log |tail -1
Output sample:
2017-03-30T02:57:10.981502Z 1 [Note] A temporary password is generated for root@localhost: Nm(!pKkkjo68e
- You may have to change the password. To do so run the following command:
mysql_secure_installation
After running this command the process will begin, enter the copied password, and set the desired configurations according to demands.
You can create a new database with the following command:
mysql -u root -p -e "create database larammerce_main"
# Install Redis
Larammerce project uses Redis for some sections, for example, as its queue management system, cache server, and session storage.
As the root user run the following command to install the Redis package:
sudo yum install redis
systemctl enable redis
systemctl start redis
2
3
# Install php 8.0
As CentOS is based on the stable version of packages, its default repositories do not contain php 8.0.
To install php 8.0 you have to add the Remi repo to your list of repositories.
Follow the steps below:
- Add the remi repo by running the following command:
rpm -Uvh https://rpms.remirepo.net/enterprise/remi-release-7.rpm
- Open the
remi-php80.repofile and change the value of theenablevariable toenable=1.
cd /etc/yum.repos.d
vim remi-php80.repo
2
- Update the list of repositories and existing packages:
sudo yum update
- Install php:
sudo yum install php
- To install Larammerce necessary php extensions , run:
sudo yum install php-bcmath php-mysql php-pdo php-mbstring php-curl php-imagick php-json php-simplexml php-soap php-xml php-redis php-mongodb php-gd php-zip
# Install MongoDB
By default, MongoDB is used as the logs DB for the Larammerce system.
To install mongoDB follow these steps:
- Create the
mongodb-org-4.4.repofile in the/etc/yum.repos.d/directory.
vim /etc/yum.repos.d/mongodb-org-4.4.repo
- Put the following codes in the file and then save it:
[mongodb-org-4.4]
name=MongoDB Repository
baseurl=https://repo.mongodb.org/yum/redhat/$releasever/mongodb-org/4.4/x86_64/
gpgcheck=1
enabled=1
gpgkey=https://www.mongodb.org/static/pgp/server-4.4.asc
2
3
4
5
6
Note: To add the repository information for the latest stable release to the file, visit the install on Red Hat (opens new window) section of MongoDB’s documentation.
- To install the latest stable version of MongoDB, issue the following command:
sudo yum install -y mongodb-org
- Enable and start the mongod by executing the commands below:
systemctl enable mongod
systemctl start mongod
2
# Install composer
Composer is an application-level package manager for the php programming language that provides a standard format for managing dependencies of php software and required libraries.
First, in the root user install the PHP CLI (command line interface) package and all other dependencies with:
yum install php-cli php-zip wget unzip
Once PHP CLI is installed, download the composer installer script with:
php -r "copy('https://getcomposer.org/installer', 'composer-setup.php');"
The command above will download the composer-setup.php file in the current working directory.
To verify the data integrity of the script, compare the script SHA-384 hash with the latest installer hash found on the Composer Public Keys / Signatures page.
The following wget command will download the expected signature of the latest Composer installer from the Composer’s Github page and store it in a variable named HASH:
HASH="$(wget -q -O - https://composer.github.io/installer.sig)"
To verify that the installation script is not corrupted run the following command.This command compares the official hash against the one you’ve downloaded:
php -r "if (hash_file('SHA384', 'composer-setup.php') === '$HASH') { echo 'Installer verified'; } else { echo 'Installer corrupt'; unlink('composer-setup.php'); } echo PHP_EOL;"
Run the following command to install Composer in the /usr/local/bin directory:
php composer-setup.php --install-dir=/usr/local/bin --filename=composer
# Setup Larammerce project
First you need to clone the project, set the configurations and then upload the project data. To do so follow these step-by-step instructions. Notice to change the commands structure based on your distro. In the following we assume you are working with Ubuntu. If you are on CentOS, change apt to yum and so on.
# Clone the project
- Create a folder
- Run the
mkdir <folder name>command in your terminal to create a folder.
mkdir projects
Run the
pwdcommand to see full pathname of the current working directory.Update your system package manager:
sudo apt update
- Install an editor (vim, nano, etc.)
sudo apt install vim
- Install git
sudo apt install git
- Clone the project
Login to your GitHub account on github.com. if you have administartor access to the project, you should clone the main project, otherwise, fork the project, go to the projects directory and run:
git clone https://github.com/your-github-account-name/larammerce.git
CentOS project files Ownership Requirement
If you are using CentOS, it is important that the project file is owned by the Apache user. To create the project as the apache user run these scripts:
su - apache
git clone https://github.com/your-github-account-name/larammerce
2
Note: If it's complaining of not having access to the repository for read and write, you will be needed to some keys. We recommend following our guide for a step-by-step walk-through of how to build a key.
- Build the key
ssh-keygen -t rsa -C " <enter a name> "
Security Alert
Never share this key to anyone. It may cause attacks to your app.
- Copy the generated key
By running the command below, you will have access to components of the file including the key. Find the key and copy.
cat id_rsa.pub
Note: The file name might be different in your system. Here we just accepted the default name for the directory. So look for a .pub file to reach the key.
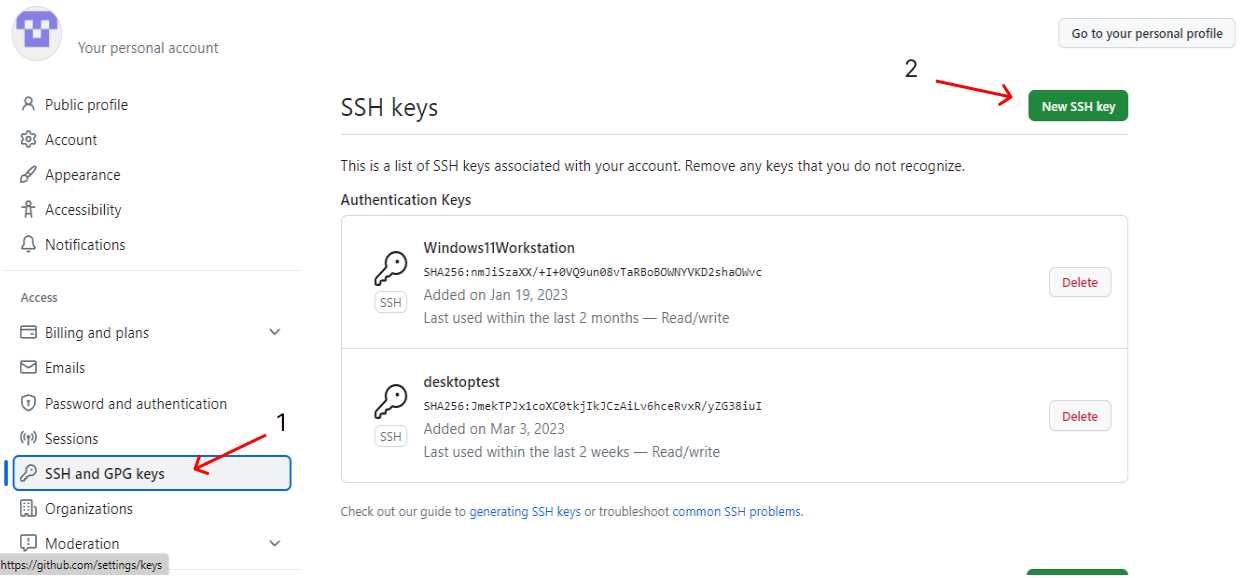
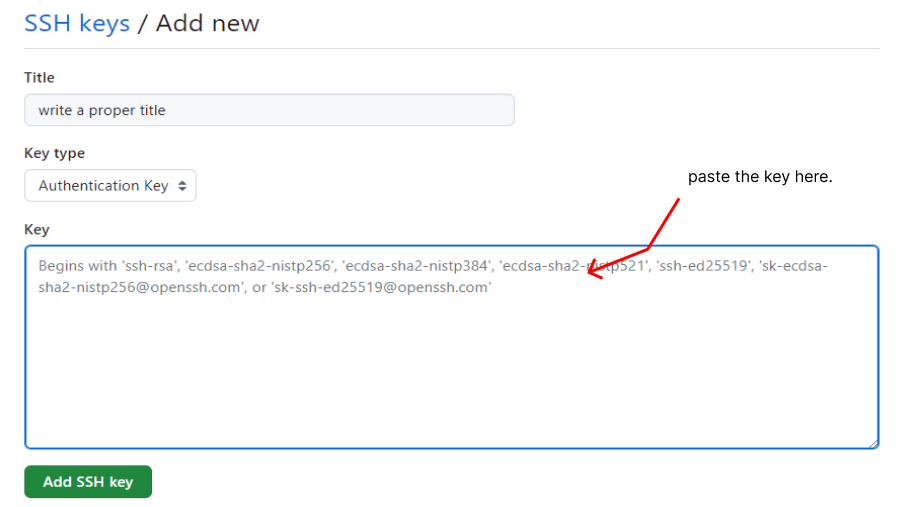
- Set the key in your GitHub account
Open your github account, go to the setting > SSH and GPG keys > new SSH key section, paste the key into the key field and then confirm the access by entering your password.
As you finalized this proccess, just back to your terminal, direct to the main repository and clone the project again.
# Configure the project
Go to the ~/projects/larammerce/ directory and run the following command:
composer install
Install node requirements:
npm install
Build the resource files running this command:
npm run prod
Now the components of .env.example file must be copied to a new file named .env.
cp .env.example .env
Through your terminal, execute the command below to set the values of .env file as the table below:
vim .env
Note: The selected text editor here is vim, replace your installed text editor name.
| Variable | Value & explanation |
|---|---|
| APP_NAME | Use any name (English) not including spaces. Use underscore sign instead. Example: Larammerce_test |
| APP_ENV | local |
| APP_KEY | This value will be generated automatically. |
| APP_DEBUG | Values: true/false. True stands for development situations, in which the error report will be displayed in detail.False value leads you to a single page displaying error 500 without any explanation or detail. In your production environment this value should be false otherwise you risk exposing sensitive configuration values to your app's end users. set this value to true. |
| APP_URL | The default value is http://localhost:8080. Replace the system IP with localhost If using another system . |
| APP_SHORT_HOST | short-host |
| APP_DEFAULT_LOCALE | fa |
| LOG_CHANNEL | Value: stack The stack channel is used to aggregate multiple log channels into a single channel. more (opens new window) |
| LOG_DEPRECATIONS_CHANNEL | Value: null It avoids notifying users of deprecations. more (opens new window) |
| LOG_LEVEL | Value: debug limitting the information written to the log destination. more (opens new window) |
| PROXY_URL | http://localhost:8080 OR the system IP you are using. |
| PROXY_SCHEMA | http |
| JWT_SECRET | This value will also be generated automatically as well as APP KEY |
# Generate required keys
Go to the larammerce directory and execute this script to generate the required app key:
php artisan key:generate
Now run the script below to generate jwt secret:
php artisan jwt:secret
Once executed these commands, you'll be able to see generated keys on .env file.
Security Alert
Do not share these keys with anyone. Otherwise, you will be at risk of being attacked.
# Setup database
Once you created a database in mysql, connect the project to database by editing values below:
| Variable | Value & explanation |
|---|---|
| DB_CONNECTION | mysql |
| DB_HOST | 127.0.0.1 |
| DB_PORT | 3306 |
| DB_DATABASE | Your database name |
| DB_USERNAME | root |
| DB_PASSWORD | Enter your password |
Also you may need to set redis connections:
| Variable | Value & explanation |
|---|---|
| QUEUE_CONNECTION | Value: sync Change this value if you are developing on queue management system. |
| CACHE_DRIVER | Value: redis/file Set this value to redis. file value also integerates as well as redis. |
| REDIS_HOST | 127.0.0.1 |
| REDIS_PASSWORD | null |
| REDIS_PORT | 6379 |
# Upload project data
To upload all the project data, run the script below.
php artisan migrate
If there is a MySQL dump file you can load it on the database by the following command and then run the migration script:
mysql -u root -p password database_name < file_name
To create primary data, seed database:
php artisan migrate --seed
Note: There is a .htaccess.example file in the /projects/larammerce/public_html/ directory. Copy and rename it into .htaccess:
cd public_html
cp .htaccess.example .htacces
2
# Setup project template
According to the Larammerce project structure, the project template (Larammerce-base-theme) has been developed independent of the backend module.
- Go to the main directory(projects directory) and run this command to clone the project:
git clone https://github.com/your-github-account-name/larammerce-base-theme.git
Go to the larammerce-base-theme directory and run the following command to install node requirements:
npm install
Then run this command to build the resource files:
npm run prod
Install
direnvtool.direnvis necessory for development to create different environment variables in each directory:
See how to install direnv here (opens new window) or follow this instruction:
In the larammerce_base_theme directory, run:
sudo apt install direnv
To hook direnv into your shell, add the following line to the end of .bashrc file by these steps:
- Open the
.bashrcfile.
cd path/to/larammerce_base_theme
vim ~/.bashrc
2
- Enable editing with
shift+g+o+enter. - Add the line below at the end of the file:
eval "$(direnv hook bash)"
- Save and close
.bashrcfile and run the command below into the terminal to update and refresh the changes made in the file:
source ~/.bashrc
In the larammerce-base-theme directory, copy the file .envrc.example and rename it to .envrc:
cp .envrcexample .envrc
- Here, you may run to an access issue, to solve it run:
direnv allow .
- Open
.envrcand add this line on top of the file:
export ECOMMERCE_BASE_PATH=/home/your-route-to-larammerce-directory/larammerce
Note: In the main directory(larammerce directory), run pwd to get the path used in the command above.
To test the accuracy of the defined variable, run:
echo $ECOMMERCE_BASE_PATH
The result should be exactly equal to the path you entered before in the .envrc file.
Go to the larammerce-base-theme directory and run this command to load the base theme:
./deploy.sh
Then go to the larammerce directory and run this script to load the server:
php -S 0.0.0.0:8080 -t public_html/
Now if you type the address "http://0.0.0.0:8080" into the browser url, you can see a 404 error page which is represented via the larammerce-base-theme.
# Working with the theme
As a sample, lets build a web page!
In the browser, type "http://0.0.0.0:8080/admin" to see the login page.
In the terminal, go to the ~/projects/larammerce/database/seeders/ directory and run:
vim UsersTableSeeder.php
In this file, you can see the username and password for admin user. Insert these values into the login fields to enter the admin panel.
Once you logged in as admin on http://0.0.0.0:8080/admin, press plus button on the left buttom of the page ,create a folder and enter some random values in the form displayed.
For example:
| Field name | Value |
|---|---|
| Title: | Test folder |
| url part: | test |
| Preference : | 0 |
| Content type : | regular |
| Enabling web page | on |
Save changes!
Afterward, another form will be displayed. Here you may need to build a blade file prior to editing the web page. To do so, follow this step-by-step instruction:
- Create a file on
/larammerce-base-theme/public/views.
touch test.blade.php
2.Add the script below to the file:
@php

echo "hello world!"

@endphp
2
3
4
5
3.Now deploy the project on larammerce-base-theme directory:
./deploy.sh
Finally, press edit web page button in the form, select the blade file name you created, and save.(here the blade file name is test)
See the result on http://0.0.0.0:8080/test.
# Video sources
# References
← License Upgrade Guide →