# Static Content
This section explains how to create templates with Static Content that can be edited through the admin panel.
For example, the image below shows a page of a website created with Larammerce.

The contents of this page are text and photos. In the previous section, creating this content was taught statically. But for the website admin to be able to edit this content, you need to get acquainted with the content module.
# Content module
There is a content module in the Larammerce Template Engine that helps the website admin edit the static contents. To edit the contents of the HTML tag, the following three attributes must be added to it.
hct-content="variable_name"  # space and special characters are not allowed.
hct-title='title' # Here is the title of this section shown to the website admin to modify and change the contents.
hct-content-type="content_types" #In this attribute, you specify the content type of the selected HTML tag.
2
3
There are seven content types in the Larammerce Template Engine as described below:
- text
- rich_text
- image
- video
- audio
- link
- file
Let's check the content types:
# Text
Everywhere you want to have a text-based section, you have to use text static content as shown below:
First, create a .blade file named: public/views/static-content.blade.php
Put the following in the file:
<div>
  <h1>This is the title of this page</h1>
  <p>This is the description of this page</p>
</div>
2
3
4
And enter this command to deploy the resources to the backend directory:
./deploy.sh
Open the admin panel in the browser and in the list of directories:
Click the Plus button  , then create a new folder
  .
.
The new folder settings are as follows:

Enter a title and url section for this page.
title: Static Contents
url section: static-contents
Activate the Web page button to connect the blade page. Then click the Edit webpage button and select the static-contents blade.
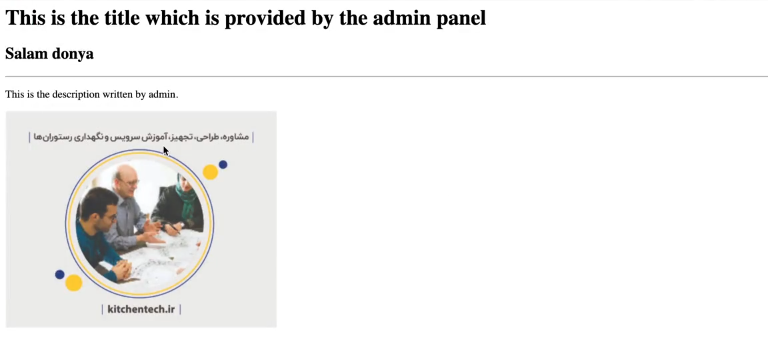
After all, you can check the localhost:8080/static-contents URL of your web page in a browser and see the page is created with the desired contents.
See the created page in the image below:

Now attributes must be added to the tag for the admin to be able to edit the text:
<div>
  <h1 hct-content="page_title" hct-content-type="text" hct-title="عنوان صفحه">
    This is the title of this page
  </h1>

  <p>This is the description of this page</p>
</div>
2
3
4
5
6
7
Enter this command:
./deploy.sh
After refreshing the editing page, an input is created where the text can be edited:

By changing the text and hitting the save button, the text of the page also changes.
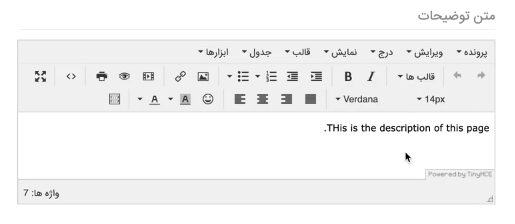
# Rich_text
Everywhere you want to have a rich_text section, you have to use rich_text content as shown below:
First, add attributes to the tag to create rich_text:
<div>
  <p
    hct-content="page_description"
    hct-content-type="rich_text"
    hct-title="متن توضیحات"
  >
    This is the description of this page
  </p>
</div>
2
3
4
5
6
7
8
9
Enter this command:
./deploy.sh
After refreshing the editing page, rich_text was created:
# Image
If you want image to be managed by the website admin, you have to use image content as shown below:
Add hct attributes to the img tag to create image:
<div>
  <img
    hct-content="first_banner"
    hct-content-type="image"
    hct-title="اولین بنر صفحه"
    src="/HCMS-assets/img/banner1.jpg"
    alt="Test"
  />
</div>
2
3
4
5
6
7
8
9
Enter this command:
./deploy.sh
After refreshing the editing page, image was created:

After creating the image content, the admin can change the image.
Check the URL of your web page in a browser and see the page is created with the desired contents:
# Video
In order for the video to be added to the web page and for the website admin to edit it, you must add the hct attributes to the video tag.
<div>
  <video
    poster="/HCMS-assets/img/video-poster.jpg"
    hct-content="video"
    hct-content-type="video"
    hct-title="ویدئو"
    aria-controls="true"
    controls
  >
    <source src="/HCMS-assets/video/larammerece.mp4" />
    Your browser does not support the video tag.
  </video>
</div>
2
3
4
5
6
7
8
9
10
11
12
13
Enter this command:
./deploy.sh
Refresh the editing web page:
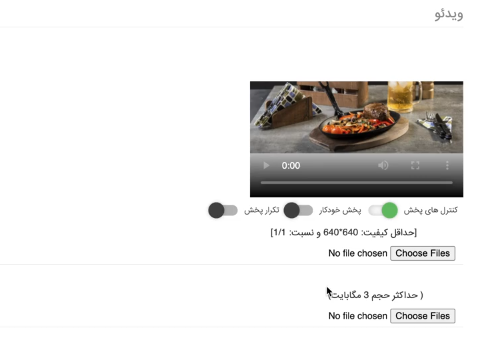
Video contact has been added and the admin can edit the video.
# Audio
Add audio content type as follows:
<div>
  <audio
    hct-content="audio"
    hct-content-type="audio"
    hct-title="صدا"
    aria-controls="true"
    controls
  >
    <source src="/HCMS-assets/audio/larammerece.mp3" />
    Your browser does not support the audio tag.
  </audio>
</div>
2
3
4
5
6
7
8
9
10
11
12
Enter this command:
./deploy.sh
By changing the audio and hitting the save button, the audio can be changed.
# Link
Link contact type is used to create an input where the admin can place a link on the web page.
<div>
  <a
    hct-content="my_link"
    hct-content-type="link"
    hct-title="لینک مورد نظر"
    href="#"
    title="Test Link"
    >This is a test link</a
  >
</div>
2
3
4
5
6
7
8
9
10
Enter this command:
./deploy.sh
Refresh the editing web page:
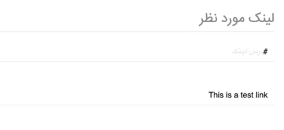
link contact type created.
# File
Add the following attributes to create the file contact type:
<div>
  <a
    hct-content="my_file"
    hct-content-type="file"
    hct-title=" فایل یکم "
    href="#"
    title="Test"
  >
    File</a
  >
</div>
2
3
4
5
6
7
8
9
10
11
Enter this command:
./deploy.sh
After creating the file content type, the admin can change the file.